-
-
- 2. Connect your Interface
- 2.1.1
 Prepare your BlackBox
 -
- 3. Initial Setup
- 3.1 Firmware Update
- Method 1: Update via CONTROL
- Method 2: Update via the Internet/Wifi
- Method 3: Update via USB Flashdrive
- 4. Usage Instructions:
- 4.1 Run a Job
- 4.2 Probing
- 4.3 Configuration
- 5. Frequently Asked Questions
- 5.4 Run/Flash Jumper
- 5.5 Device Test Mode
- 6. Tips and Tricks
-
Sidebar
Table of Contents
4.2 OpenBuilds Interface: Usage Instructions: Probing
Note: At this time Interface only supports the OpenBuilds XYZ Probe Plus
Prerequisite: Ensure you have Prepared a USB Flashdrive for use with Interface as the Probe macros are included in the Supporting Files copied to the flashdrive during this process. Make sure the USB drive is inserted into your Interface as well. If not, you will get “PROBE FILE NOT FOUND” errors when you attempt to Probe
Interface can be used to Probe the origin of your Stock: Go to Tools and Utils > Probe
Run a Probe
1. Jog to the Start position
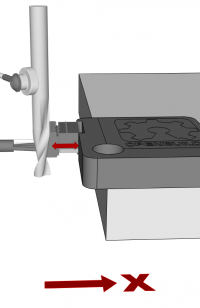
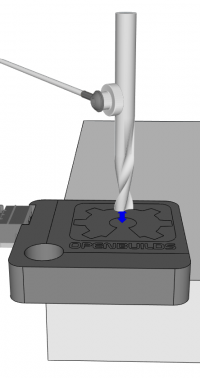
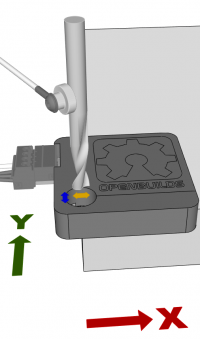
See below starting positions: Manually jog to the correct starting position for the probing operation you intend running. Starting positions are the same as those used in OpenBuilds CONTROL.
2. Attach the Clip and position the Touchplate
NB: Make sure the Magnet is clipped to the Endmill, and position the Touchplate on the front-left corner of the stock.
3. Open the Probing Menu
Go to the Tools and Util > Probe menu
4. Select Bit Diameter
Press the OK button while the menu is on “Bit Dia” to change the Bit diameter. You have to specify the endmill diameter for the probing wizard to calculate the correct offsets
5. Select the Probing Operation
Select X-Zero, Y-Zero, Z-Zero or XYZ-Zero as per your intention, and press the OK button to start the probing routine
Starting positions for each Probing Operation
NB You have to manually jog to these positions prior to starting the Probing procedure:
X-Zero Probe
Y-Zero Probe
Z-Zero Probe
XYZ-Zero Probe
Page Tools
All rights reserved. This Documentation or any portion thereof including but not limited to (menu structures, images, layout, videos, graphical artwork, logos, names, trademarks, etc.) may not be reproduced or used in any manner whatsoever without the express written permission of OpenBuilds, LLC


