-
-
- 2. Connect your Interface
- 2.1.1
 Prepare your BlackBox
 -
- 3. Initial Setup
- 3.1 Firmware Update
- Method 1: Update via CONTROL
- Method 2: Update via the Internet/Wifi
- Method 3: Update via USB Flashdrive
- 4. Usage Instructions:
- 4.1 Run a Job
- 4.2 Probing
- 4.3 Configuration
- 5. Frequently Asked Questions
- 5.4 Run/Flash Jumper
- 5.5 Device Test Mode
- 6. Tips and Tricks
-
Sidebar
docs:interface:layout
Introduction to the OpenBuilds Interface Features
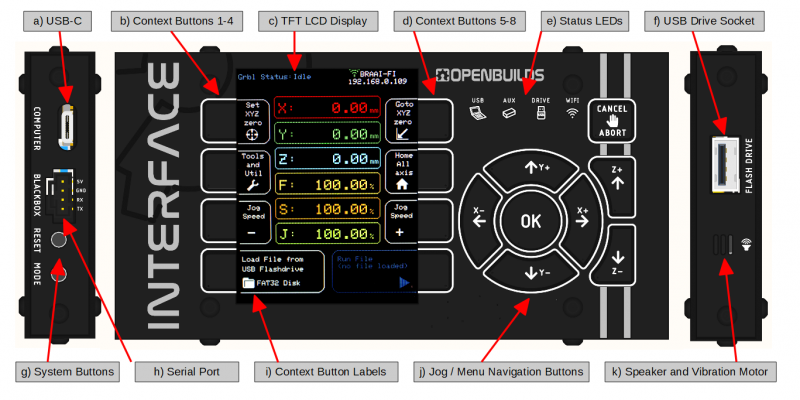
- a) USB-C Socket: For connecting your Interface, to your Computer. Can be used for firmware updates and limited communications pass-through. Can also be used to power the Interface via USB-C Cable and a spare 5V source
- b) Context Buttons 1-4: Touch activated buttons one the left side of the LCD, which change context depending on the label printed next to the button on the LCD. See [i] for more information
- c) TFT LCD Display: Color LCD screen for displaying Grbl status, Digital Readouts, Menus, Wifi Information and Button labels.
- d) Context Buttons 5-8: Touch activated buttons one the right side of the LCD, which change context depending on the label printed next to the button on the LCD. See [i] for more information
- e) Status LEDs: Displays system information
- USB LED: Indicates Receive (Green) and Transmit (Red) of data between the Interface and the computer port
- AUX LED: Indicates Receive (Green) and Transmit (Red) of data between the Interface and a connected CNC controller, like an OpenBuilds BlackBox 4X or X32
- Drive LED: Indicates a USB Drive is detected as connected to the USB Flash Drive port
- Wifi LED: Indicates statusses such as connecting, connected and transfer of data over Wifi
- f) USB Drive Socket: Used for connecting a USB Flash drive containing GCODE files, Probe routines, etc
- Note FAT32 Formatted drives only
- Note that filenames are displayed in 8.3 format, no long-filename support at this time
- You can also use the USB Flash drive to update the Interface firmware, see Section 3.2
- g) System Buttons:
- Reset: Reboots the Interface
- Mode: Can be used to put the Interface into Bootloader mode for firmware updates via the USB-C Port (See Section 3.2 )
- h) Serial Port: Used to connect the Interface to a CNC Controller running Grbl 1.1f or later. Comes with cable for connecting to an OpenBuilds BlackBox 4X's Aux Port
- i) Context Button Labels: Labels for the Context Buttons in section [b] and [d] above are displayed on the LCD. This tells you what each context-button onscreen at this time, will do. Disabled buttons are grayed out
- j) Jog / Menu Navigation Buttons: Can be used to jog your CNC machine in X, Y and Z. If a menu, error, alarm, or other dialog is open onscreen, the buttons can also be used to navigate the menu.
- k) Speaker and Vibration Motor: Used to provide tactile feedback of button presses on the capacitive touch button panel, as well as audible feedback for button presses and notifications. Can be enabled/disabled from the Tools and Utils > Interface Config menu.
docs/interface/layout.txt · Last modified: 2024/08/05 15:15 (external edit)
Page Tools
All works Copyright © by OpenBuilds®, LLC
All rights reserved. This Documentation or any portion thereof including but not limited to (menu structures, images, layout, videos, graphical artwork, logos, names, trademarks, etc.) may not be reproduced or used in any manner whatsoever without the express written permission of OpenBuilds, LLC
All rights reserved. This Documentation or any portion thereof including but not limited to (menu structures, images, layout, videos, graphical artwork, logos, names, trademarks, etc.) may not be reproduced or used in any manner whatsoever without the express written permission of OpenBuilds, LLC

